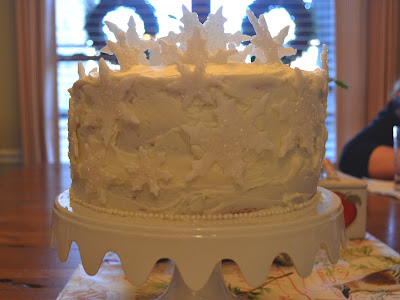
This year, my mom decided that she wanted me to bake Mrs. Billett's Wintry White Cake out of Southern Living magazine for our family get-together. Well, with only a few bumps and bruises, it turned out wonderfully (and tasted even better than it looked!)
It's a three-layer, all-white hunk of vanilla yumminess. I'm usually a chocolate kind of girl, but this one took the cake (pun intended).
Mrs. Billett's Wintry White Cake
Makes: 10-12 servings
Total time: 2 hours (or so the recipe says...)
1 cup milk
1 1/2 tsp. vanilla extract (I used clear imitation vanilla to keep the cake really white)
1 cup butter, softened
2 cups sugar
3 cups cake flour
1 Tbsp. baking powder
5 egg whites
1. Preheat oven to 350°. Grease 3 (8-inch) round cake pans.
2. Stir together milk and vanilla.
3. Beat butter at medium speed with a heavy-duty electric mixer until creamy; gradually add sugar, beating until light and fluffy. Sift together flour and baking powder; add to butter mixture alternately with milk mixture, beginning and ending with flour mixture (this may seem ridiculous, but it really does matter... don't leave that step out!). Beat at low speed just until blended after each addition.
4. Beat egg whites at medium speed until stiff peaks form; gently fold into batter. Pour into prepared pans. (Okay, I had no clue what "stiff peaks" meant. This just means that when you pull the mixer out of the mixture, it's thick enough that it pulls up and sticks.)
5. Bake at 350° for 20-23 minutes or until a wooden pick inserted in center comes out clean.
6. Cool in pans on wire racks 10 minutes. Remove from pans to wire racks to cool completely.
Vanilla Buttercream Frosting:
Makes: 4 1/2 cups
1 cup butter, softened
1/4 tsp. salt
2 (16 oz.) packages powdered sugar
6 to 7 Tbsp. milk
1 Tbsp. vanilla extract (also used the clear imitation vanilla)
Beat butter and salt at medium speed with an electric mixer 1-2 minutes or until creamy; gradually add powdered sugar alternately with 6 Tbsp. milk, beating at low speed until blended and smooth after each addition. Stir in vanilla. If desired, beat in final Tbsp. of milk until frosting reaches desired consistency.
If I were to do this cake again, I would probably double the frosting recipe. Call me crazy, but I like plenty of frosting in between every layer and on the sides. I'd rather have too much than too little!
Another thing that I typically do is bake the actual cake the night before and, once completely cooled, I put each layer in the freezer overnight. The next day, I pull each layer out one by one to frost. This makes the cake so much easier to frost and adds a little extra moisture once it unfreezes!
Snowflakes:
For these beauties, I cheated. I bought ready-made fondant on Amazon. They're just for looks mainly so I didn't really take the time to make them from scratch.
I cut them out the night before and let them set up overnight. The next morning, I brushed them with milk and sprinkled on Shimmering Sugar from Williams-Sonoma. Beautiful!

BLOOPERS:
Like I said, I always bake the layers the night before. So around 6 o'clock I started baking. Everything was going well... Until I pulled the layers out of the oven. One was perfectly golden brown and moist. The other two were completely sloped and black on one side. So, guess who got to rebake two layers at 10 o'clock at night? This girl.
I also have a huge issue with softening butter. I never think to take the butter out of the refrigerator in time to soften naturally, so I always have to resort to putting them in a Ziploc bag and beating them with a meat tenderizer. If you do this, the butter will flatten out and after about 5 minutes will be ready to use. Well, as "easy" as this sounds, I really struggle with it. I ended up getting butter all over me and all over my kitchen. Classic butter mix up.
Enjoy, and Merry Christmas!
Love always,
T


My daughter....Awesome!
ReplyDelete